
AMP(Accelerated Mobile Pages)は2015年に公開されたモバイルページの高速化のための手法で、国内サイトでも普及しつつあります。今回はAMPについて、概要からマークアップおよび検証の手順まで、実際の導入方法についてご紹介します。
ここ数年、ホームページの閲覧はスマートフォンが主流となり、モバイルページの表示高速化は重要なテーマとなっています。
AMPとは?
AMP(Accelerated Mobile Pages)とはGoogleが推進しているモバイルページを高速に表示させるための手法で
・AMP HTML
・AMP JS
・AMP Cache
の3つの技術により高速化を実現しています。
AMP HTMLは表示高速化のためにHTMLに独自の制限と拡張性を加えたもの、
AMP JSはAMP HTMLの読み込み速度を最適化するためのライブラリ、
AMP CacheはGoogleがAMP対応コンテンツをキャッシュし、CDN(Contents Delivery Network)から配信する仕組みとなります。
ここからはAMP HTMLの記述ルールの紹介、実際に作成する手順を紹介していきます。
AMP HTMLの記述ルール
必要なマークアップ
必要なマークアップ
<!doctype html>
通常のHTMLと同様に文書の先頭にdoctype宣言をします。
<html ⚡>または<html amp>
htmlタグは上記のいずれかの表記となります。
<meta charset="UTF-8">
headタグ内の最初の要素で文字コードの宣言をします。
<script async src="https://cdn.ampproject.org/v0.js"></script>
headタグ内の2番目の要素でamp.jsライブラリを読み込みます。
<meta name="viewport" content="width=device-width, initial-scale=1.0">
headタグ内でviewportを指定します。通常のHTMLのビューポートと同様ですが、initial-scale=1.0が推奨されています。
<style amp-boilerplate>body{-webkit-animation:-amp-start 8s steps(1,end) 0s 1 normal both;-moz-animation:-amp-start 8s steps(1,end) 0s 1 normal both;-ms-animation:-amp-start 8s steps(1,end) 0s 1 normal both;animation:-amp-start 8s steps(1,end) 0s 1 normal both}@-webkit-keyframes -amp-start{from{visibility:hidden}to{visibility:visible}}@-moz-keyframes -amp-start{from{visibility:hidden}to{visibility:visible}}@-ms-keyframes -amp-start{from{visibility:hidden}to{visibility:visible}}@-o-keyframes -amp-start{from{visibility:hidden}to{visibility:visible}}@keyframes -amp-start{from{visibility:hidden}to{visibility:visible}}</style><noscript><style amp-boilerplate>body{-webkit-animation:none;-moz-animation:none;-ms-animation:none;animation:none}</style></noscript>
headタグ内に上記のampボイラープレートを記述します。
<link rel="canonical" href="…">
headタグ内でcanonicalの設定を記述します。hrefの値は通常版HTMLが存在する場合は対象のHTMLのURL、存在しない場合はこのAMP HTML自体のURLを記述します。
JSON-LDについて
AMPではGoogle 検索結果への表示のため構造化データが必要となります。構造化データはいくつか記述方法がありますが、今回はJSON-LDでの記述方法を説明します。
記事の構造化データ(JSON-LD)例
<script type="application/ld+json">
{
    "@context": "http://schema.org",
    "@type": "Article",
    "mainEntityOfPage": {
        "@type": "WebPage",
        "@id": "インデックスページ"
    },
    "headline": "記事タイトル、見出し",
    "alternativeHeadline": "リード文",
    "description": "記事概要",
    "image": [
          "記事画像URL",
          "記事画像URL",
          "記事画像URL"
     ],
    "datePublished": "2019-06-25T00:00:00+00:00", //投稿日
    "dateModified": "2019-06-25T00:00:00+00:00",  //更新日
    "publisher": {
    "@type": "Organization",
    "name": "発行元組織名",
    "logo": {
        "@type": "ImageObject",
        "url": "ロゴ画像のURL"

    },
    "author": {
        "@type": "Person",
        "name": "執筆者"
    },
}
</script>
imageで指定する画像は例のように複数指定することも可能です。
またGoogleの推奨は幅 1,200px以上、幅×高さが800,000px以上となっています。
ロゴ画像も推奨サイズがあり、幅600px×高さ60px以内の長方形で幅600px高さ60pxのどちらかに揃えないといけません。
AMP HTMLで注意すべき点
HTML記述の注意点
AMP HTMLでは使用できないタグや専用タグに置き換えが必要なタグがあります。
その一覧を下記にまとめております。
| タグ | 対応方法・説明 | |
|---|---|---|
| 置き換えが必要なタグ | img | amp-img:画像 amp-anim:アニメーションGIF |
| audio | amp-audio | |
| video | amp-video | |
| iframe | amp-iframe | |
| 制限があるタグ・ 注意が必要なタグ |
a | href属性に”javascript:” の記述はできない。target属性は”_blank”のみ |
| style | 外部CSSのリンクは不可。ampボイラープレートの記述は必須。 追加の記述は1つのみ可能 <style amp-custom> |
|
| script | type属性が”application/ld+json”もしくは”text/plain”のみ使用可 | |
| form | amp-formコンポーネントの読み込みが必要 | |
| 禁止されているタグ | base, frame, frameset, object, embed, applet, param |
CSS記述の注意点
CSSも同様に様々な制限があります。前提として外部スタイルシートは利用できず、head内に記述する必要があります。またCSSの容量は 50kb以内と決められており、オーバーしてしまうとエラーになります。
その他注意すべき点の一覧を下記にまとめております。
| 項目 | 説明 | |
|---|---|---|
| 使用できないスタイル | !important修飾子 | ― |
| -amp-からはじまるclass指定 | -amp-からはじまるclassを定義できずまた、ユーザースタイルシート内で指定できない | |
| i-amp-からはじまるタグ指定 | i-amp-ではじまるタグをユーザースタイルシートでは指定できない | |
| transitionプロパティ | opacity, transformのみ指定可能 | |
| 制限のあるスタイル | transitionプロパティ | opacity, transformのみ指定可能 |
| @keyframes | opacity, transformのみ指定可能 |
CSS記述の注意点
これまでAMPでは独自のJavaScriptは使用できませんでしたが、最近になりamp-scriptがサポートされました。ただ、まだ制限が多くjQueryなどの既存のライブラリの多くも利用できません。カルーセルやモーダル、ハンバーガーメニューなど機能としてよく使われるものは専用のAMP拡張コンポーネントで実装することが多くなります。
AMP HTML 記述手順
ここでは通常のHTMLをAMP化する方法を順を追って説明します。
サンプルで使用するHTML, CSSは以下のようなものとなります。
元になるhtmlサンプル(sample.html)の記述
<!DOCTYPE html>
<html lang="ja">
<head>
<title>AMP化サンプル</title>
<link rel="stylesheet" href="sample.css">
</head>
<body>
<h1>AMP化サンプル</h1>
<img src="image.png">
</body>
</html>
CSS(sample.css)の記述
body {
    margin: 0;
    padding: 0;
    font-size: 16px;
    color: #111;
}
h1 {
    font-size: 28px;
}
img {
    width: 100%;
    height: auto;
}
手順1.マークアップを置き換える
まずはAMPで必要なタグ・属性の追記をします。
AMP対応HTML(sample_amp.html)
<!DOCTYPE html>
<html amp lang="ja">
<head>
<meta charset="UTF-8">
<script async src="https://cdn.ampproject.org/v0.js"></script>
<meta name="viewport" content="width=device-width, initial-scale=1.0">
<title>AMP化サンプル</title>
<style amp-boilerplate>body{-webkit-animation:-amp-start 8s steps(1,end) 0s 1 normal both;-moz-animation:-amp-start 8s steps(1,end) 0s 1 normal both;-ms-animation:-amp-start 8s steps(1,end) 0s 1 normal both;animation:-amp-start 8s steps(1,end) 0s 1 normal both}@-webkit-keyframes -amp-start{from{visibility:hidden}to{visibility:visible}}@-moz-keyframes -amp-start{from{visibility:hidden}to{visibility:visible}}@-ms-keyframes -amp-start{from{visibility:hidden}to{visibility:visible}}@-o-keyframes -amp-start{from{visibility:hidden}to{visibility:visible}}@keyframes -amp-start{from{visibility:hidden}to{visibility:visible}}</style><noscript><style amp-boilerplate>body{-webkit-animation:none;-moz-animation:none;-ms-animation:none;animation:none}</style></noscript>
<link rel="stylesheet" href="sample.css">
<link rel="canonical" href="https://www.pc-koubou.jp/magazine/sample.html">
</head>
<body>
<h1>AMP化サンプル</h1>
<amp-img src="image.png" width="600" height="400" layout=”responsive”></amp-img>
</body>
</html>
amp-imgではimgタグにはないlayout属性でレイアウト設定が可能となっており、今回は“responsive”としています。
※responsiveの場合 width/heightの指定も必須となるので合わせて記述します
layout属性についての詳細は下記をご参照ください。
“レイアウトとメディアクエリ – amp.dev”.2019.AMP Open Source Project
https://amp.dev/ja/documentation/guides-and-tutorials/develop/style_and_layout/control_layout
元のhtmlファイルにはamp版htmlが存在することを示す <link rel=”amphtml”>を追記します。
sample.html
<!DOCTYPE html>
<html lang="ja">
<head>
<meta name="viewport" content="width=device-width, initial-scale=1.0">
<title>AMP化サンプル</title>
<link rel="stylesheet" href="sample.css">
<link rel="amphtml" href="https://www.pc-koubou.jp/magazine/sample_amp.html">
</head>
<body>
<h1>AMP化サンプル</h1>
<img src="image.png">
</body>
</html>
手順2.CSSの記述
外部リンクで定義されていたCSSをheadタグ内<style amp-custom>に移植します。
<!DOCTYPE html>
<html amp lang="ja">
<head>
<meta charset="UTF-8">
<script async src="https://cdn.ampproject.org/v0.js"></script>
<meta name="viewport" content="width=device-width, initial-scale=1.0">
<title>AMP化サンプル</title>
<style amp-boilerplate>body{-webkit-animation:-amp-start 8s steps(1,end) 0s 1 normal both;-moz-animation:-amp-start 8s steps(1,end) 0s 1 normal both;-ms-animation:-amp-start 8s steps(1,end) 0s 1 normal both;animation:-amp-start 8s steps(1,end) 0s 1 normal both}@-webkit-keyframes -amp-start{from{visibility:hidden}to{visibility:visible}}@-moz-keyframes -amp-start{from{visibility:hidden}to{visibility:visible}}@-ms-keyframes -amp-start{from{visibility:hidden}to{visibility:visible}}@-o-keyframes -amp-start{from{visibility:hidden}to{visibility:visible}}@keyframes -amp-start{from{visibility:hidden}to{visibility:visible}}</style><noscript><style amp-boilerplate>body{-webkit-animation:none;-moz-animation:none;-ms-animation:none;animation:none}</style></noscript>
<style amp-custom>
body {
    margin: 0;
    padding: 0;
    font-size: 16px;
    color: #111;
}
h1 {
    font-size: 28px;
}
amp-img {
    width: 100%;
    height: auto;
}
</style>
</head>
<body>
<h1>AMP化サンプル</h1>
<amp-img src="image.png" width="600" height="400" layout=”responsive”>
</body>
</html>
htmlでimgをamp-imgに書き換えているためcssもそれに合わせて変更します。
手順3.JSON-LDの記述
JSON-LDを準備します。各項目の設定内容は当マガジンサイトで公開することを想定した記述内容となっています。
<script type="application/ld+json">
{
  "@context": "http://schema.org",
  "@type": "NewsArticle",
  "mainEntityOfPage":{
    "@type":"WebPage",
    "@id":"https://www.pc-koubou.jp/magazine/sample.html"
  },
  "headline": "AMP化サンプル",
  "description": "AMP化サンプルのページ",
  "image": {
    "@type": "ImageObject",
    "url": "https://www.pc-koubou.jp/magazine/image.png",
    "width": 600,
    "height": 400
  },
  "datePublished": "2019-06-30",
  "dateModified": "2019-06-30",
  "author": {
    "@type": "Person",
    "name": "パソコン工房NEXMAG編集部"
  },
   "publisher": {
    "@type": "Organization",
    "name": "パソコン工房NEXMAG",
    "logo": {
      "@type": "ImageObject",
      "url": "https://www.pc-koubou.jp/magazine/assets/images/common/logo.jpg",
      "width": 450,
      "height": 60
    }
}
</script>
完成 AMP HTML
準備したJSON-LDをhead内に追記すると、AMP HTMLの完成です。
<!DOCTYPE html>
<html amp lang="ja">
<head>
<meta charset="UTF-8">
<script async src="https://cdn.ampproject.org/v0.js"></script>
<meta name="viewport" content="width=device-width, initial-scale=1.0">
<title>AMP化サンプル</title>
<link rel="canonical" href="https://www.pc-koubou.jp/magazine/sample.html" />
<style amp-boilerplate>body{-webkit-animation:-amp-start 8s steps(1,end) 0s 1 normal both;-moz-animation:-amp-start 8s steps(1,end) 0s 1 normal both;-ms-animation:-amp-start 8s steps(1,end) 0s 1 normal both;animation:-amp-start 8s steps(1,end) 0s 1 normal both}@-webkit-keyframes -amp-start{from{visibility:hidden}to{visibility:visible}}@-moz-keyframes -amp-start{from{visibility:hidden}to{visibility:visible}}@-ms-keyframes -amp-start{from{visibility:hidden}to{visibility:visible}}@-o-keyframes -amp-start{from{visibility:hidden}to{visibility:visible}}@keyframes -amp-start{from{visibility:hidden}to{visibility:visible}}</style><noscript><style amp-boilerplate>body{-webkit-animation:none;-moz-animation:none;-ms-animation:none;animation:none}</style></noscript>
<style amp-custom>
body {
    margin: 0;
    padding: 0;
    font-size: 16px;
    color: #111;
}
h1 {
    font-size: 28px;
}
amp-img {
    width: 100%;
    height: auto;
}
</style>
<script type="application/ld+json">
{
  "@context": "http://schema.org",
  "@type": "NewsArticle",
  "mainEntityOfPage":{
    "@type":"WebPage",
    "@id":"https://www.pc-koubou.jp/magazine/sample.html"
  },
  "headline": "AMP化サンプル",
  "description": "AMP化サンプルのページ",
  "image": {
    "@type": "ImageObject", // サムネイル画像
    "url": "https://www.pc-koubou.jp/magazine/image.png",
    "width": 600,
    "height": 400
  },
  "datePublished": "2019-06-26",
  "dateModified": "2019-06-26",
  "author": {
    "@type": "Person",
    "name": "パソコン工房NEXMAG編集部"
  },
   "publisher": {
    "@type": "Organization",
    "name": "パソコン工房NEXMAG",
    "logo": {
      "@type": "ImageObject",
      "url": "https://www.pc-koubou.jp/magazine/assets/images/common/logo.jpg",
      "width": 450,
      "height": 60
    }

}
</script>
</head>
<body>
<h1>AMP化サンプル</h1>
<amp-img src="image.png" width="600" height="400" layout="responsive">
</body>
</html>
なお、今回ご紹介したマークアップでは説明のために非常にシンプルな内容のWebページをAMP対応させていましたが、実際のスマートフォン向けWebサイトで用いられるハンバーガーメニューや、複数画像が横にスライドするカルーセルなどもAMPの拡張コンポーネントを使用することで実現することが可能になります。
拡張コンポーネントについては別の機会にご紹介したいと思います。
完成したAMP HTMLを検証する
完成したAMP HTMLは記述が正しいか検証する必要があります。今回の記事ではChrome開発ツールとサーチコンソールのAMPテストツールの2つのツールを使用しHTMLを検証します。
Google Chrome 開発ツールでの検証
Chromeを立ち上げ、検証するAMP HTMLのページを表示させます。[F12]キーを押すと下記のように開発ツールが表示されます。

アドレス欄のURLの後ろに「#development=1」と追記し、ページを再読込します。
記述に問題がなければ下記のように 「AMP validation successful.」と表示されます。

下記ではamp-imgタグにheight属性が指定されていないというエラーが表示されています。
このようにエラーが表示される場合は対象箇所を修正し、あらためて検証する必要があります。
")
サーチコンソールでの検証
サーチコンソールのAMPテストツールページへアクセスします。
https://search.google.com/test/amp?hl=ja
 今サーチコンソールAMPテストツール
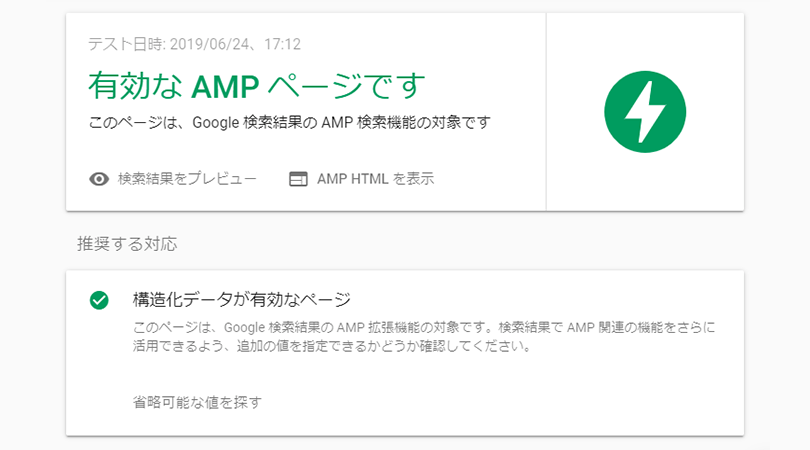
検証するページのURLを入力しテストを開始します。対象のページがベーシック認証がかかっている、robots.txtでブロックされているなどサーチコンソールからアクセスできない状態にあるとテストが行われません。
 今サーチコンソールのAMPテストでの表示例
テストが完了し問題がなければ上記のような表示になります。サーチコンソールでのAMPテストではAMPの文法のチェックに加えて、構造化データの検証も行われます。
エラーがある場合は下記のような表示になります。この場合はエラー内容に合わせてページを修正していくことになります。

今回はAMPの概要と基本的なマークアップ方法についてご紹介しました。AMPに対応することでスマートフォンにおける検索サイト経由での表示が速くなり、ユーザーから見たサイトの快適性も向上すると思いますので、今回の記事を参考に、AMP対応に挑戦していただけたらと思います。
なお、今回ご紹介したマークアップでは説明のために非常にシンプルな内容のWebページをAMP対応させていましたが、実際のスマートフォン向けWebサイトで用いられるハンバーガーメニューや、複数画像が横にスライドするカルーセルなどもAMPの拡張コンポーネントを使用することで実現することが可能になります。
拡張コンポーネントについては別の機会にご紹介したいと思います。
[ネクスマグ] 編集部
パソコンでできるこんなことやあんなこと、便利な使い方など、様々なパソコン活用方法が「わかる!」「みつかる!」記事を書いています。